Ready to Generate XPath Effortlessly? Start using SelectorsHub to streamline your XPath creation for XML elements and enhance your automation workflows!
👉 Explore More Tutorials on SelectorsHub
XPath is an essential tool for working with XML files, especially in applications like automated testing and data extraction. SelectorsHub simplifies the process by allowing you to generate XPath quickly and efficiently. Follow these steps to use SelectorsHub for generating XPath from your XML file.
Step 1: Prepare the XML File
To enable XPath generation, you’ll first need to make your XML file browser-compatible:
Copy Your XML File: Ensure you create a duplicate of the original XML file to preserve the original data.
Change the File Extension: Rename the copied file by replacing the
.xml
extension with.html
. For example, renamedata.xml
todata.html
.
This step makes the file readable in a web browser.
Step 2: Open in Browser
Locate the newly created HTML file in your file explorer.
Double-click the File: This action will open the file in your default web browser, displaying the XML structure as an HTML document.
Step 3: Launch SelectorsHub
SelectorsHub is a browser extension that integrates with developer tools to generate XPaths. To access it:
Open Developer Tools: Right-click on any element in the browser view and select Inspect or press
Ctrl+Shift+I
(Windows/Linux) orCmd+Option+I
(Mac).Navigate to SelectorsHub Tab: In the developer tools, locate and open the SelectorsHub tab.
If you don’t see the tab, ensure that SelectorsHub is installed and enabled in your browser.
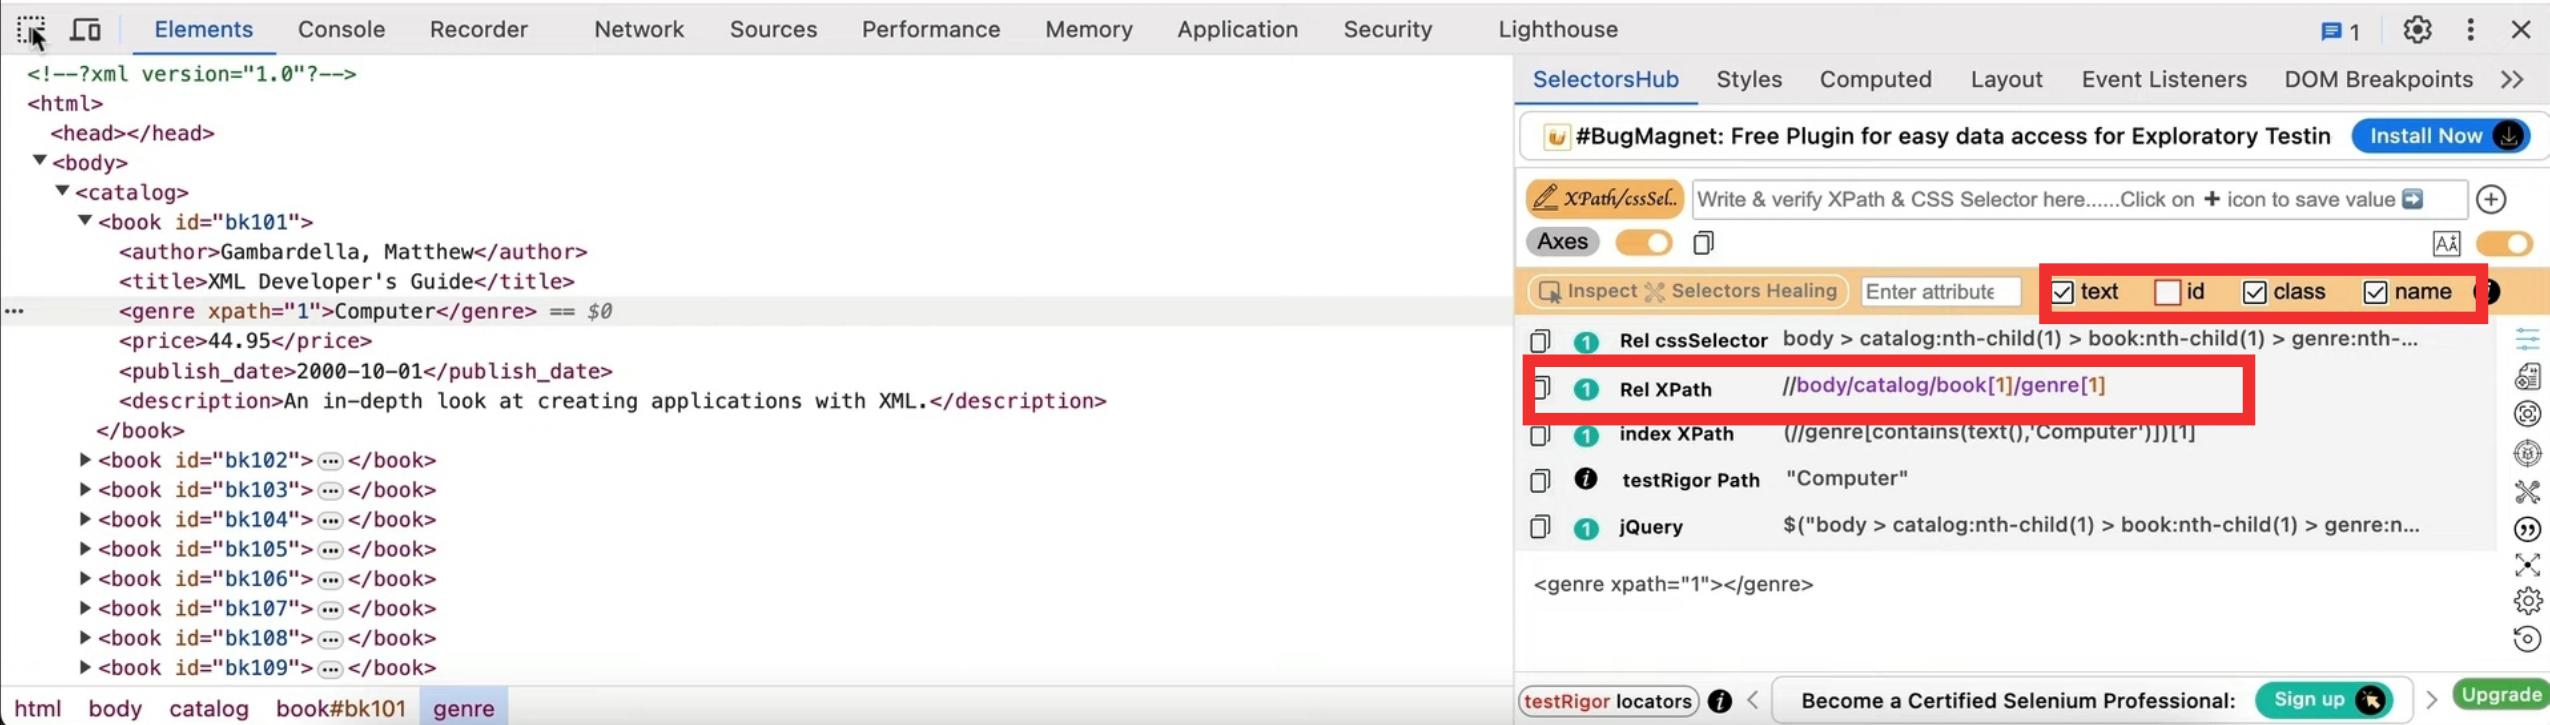
Step 4: Generate XPath
With SelectorsHub ready, you can now generate XPath:
Inspect the Desired Element: Hover over the XML structure in the browser, right-click the element of interest, and select Inspect to highlight it in the developer tools.
View Generated XPath: SelectorsHub will automatically display the XPath for the selected element in its interface.
Tips for Customizing XPath:
If the generated XPath includes dynamic IDs (e.g., IDs that change on reload), you can:
Uncheck the ID Attribute Filter: In the SelectorsHub interface, disable the ID attribute filter to generate an XPath that doesn’t rely on dynamic IDs.
Step 5: Copy XPath
Once you have the desired XPath:
Right-click the Generated XPath: In SelectorsHub’s panel, right-click on the XPath.
Copy the XPath: Select the copy option and paste it into your application or testing framework as needed.
By following these steps, you can efficiently generate XPath for any element in your XML file using SelectorsHub in a browser environment. This method saves time and ensures precision in your testing and data extraction tasks.
Conclusion
Using SelectorsHub to generate XPath for XML elements is an efficient and user-friendly method. It eliminates the need for manual XPath creation, saving time and reducing errors. By converting your XML file to HTML and leveraging the powerful features of SelectorsHub, you can streamline your workflow and focus on other critical tasks. Whether you’re a developer, tester, or data analyst, this approach ensures precision and enhances productivity.
We hope this guide helps you make the most out of SelectorsHub. Feel free to explore its other features to further improve your testing and automation processes.
General FAQ
Can I generate XPath for elements with dynamic attributes?
What should I do if I don’t see the SelectorsHub tab in developer tools?
Why do I need to change the file extension from .xml to .html?
How can I install SelectorsHub in my browser?
Can SelectorsHub generate CSS Selectors too?
Do I need coding skills to use SelectorsHub?
Is SelectorsHub free to use?
Is there a way to verify if the generated XPath works?
Related Blogs
Automate Check My Links using Playwright
Automate ‘Check My Links’ through Playwright Check My Links – Download Link CRX plugin link to get the extension folder – Download Link Please use the below code to automate Check My Links using Playwright. Kindly follow the attached tutorial below for the detailed explanation and working demo. Code to automate one Page import {…
Is Page Load Timer Safe To use?
Is Page Load Timer Safe and Secure? Does Page Load Timer save user data? Yes absolutely, Page Load Timer is the most secured browser plugin. It runs offline in user’s local system and doesn’t save any data on any server. Page Load Timer is officially ‘Featured’ plugin at Chrome Store and it follows all the…
Is Check My Links Safe To use?
Is Check My Links Safe and Secure? Does Check My Links save user data? Yes absolutely, it is the most secured browser plugin. Check My Links is officially ‘Featured’ plugin at Chrome Store and it follows all the recommended practices for chrome extensions. It is declared here in chrome store that it will not collect or use your…